Today, I went to Lowe's and picked up the pieces for my gas pipe experiment. A couple people have PM'd me and asked about my new method, but all I will say for now, is that it's basically reinventing the wheel. I don't want to post any photos until I am certain it will work.
Tomorrow I will work at starting to fill the edges of the legs, and use a chisel to open up the pockets under the shoulders.
That's all for now folks!
Wednesday, December 7, 2011

Monday, December 5, 2011
And here they are!!!
Take a look at these beauties!! I am ready to start looking for a gas pipe configuration to attach them with. I am going to experiment with a few different types of attachment methods of gas-pipe attachment before I decide anything. I think I have something up my sleeve, but we'll see how it pans out. As for now, I have made a list of things I need at Home Depot to begin the process, so next time I get a chance, i'll be heading there. Next on the list are things like...
1. Cut out skirt 3rd leg hole.
2. Begin filling/sanding legs.
3. Buy resin beefy ankles.
Thats it for now, here's the pic!!!

1. Cut out skirt 3rd leg hole.
2. Begin filling/sanding legs.
3. Buy resin beefy ankles.
Thats it for now, here's the pic!!!

Sunday, December 4, 2011
almost done with the legs!
My oh my!! Today was a short, but good day. I finished routing the pieces to finish the legs, and then I glued them up! Tomorrow morning, I will have two complete legs that will be ready for sanding and finishing! What a great day it is!!! I also discovered another 'protip' that I made a thread about on the forums, but because it would be out of character to not have it on my blog, i'll copy and paste here.
PROTIP:When you're routing templates out for legs, put a "bushing" on top of your wood between the template. The router bit has a washer that tends to cut into the templates, which in turn, can mess up your templates horrifically!! To counter-act this, place a piece of styrene, or 1/4" plywood, or anything BETWEEN the wood to be routed, and the template. This will, in turn, guarantee that your template will be in the same shape it was the first time, and that the board underneath the 'bushing' will have a perfect shape.
That tip will save you a lot of potential troubles!!!
In other news, I need to start acquiring finishing pieces to the legs and have already started looking for some beefy ankles (I call them cankles). The dome should be here in the next 3 weeks, and I still have no clue about my aluminum skins!!!
Tomorrow, I will pick up some pieces for attaching the legs and get some leg photos up!!
PROTIP:When you're routing templates out for legs, put a "bushing" on top of your wood between the template. The router bit has a washer that tends to cut into the templates, which in turn, can mess up your templates horrifically!! To counter-act this, place a piece of styrene, or 1/4" plywood, or anything BETWEEN the wood to be routed, and the template. This will, in turn, guarantee that your template will be in the same shape it was the first time, and that the board underneath the 'bushing' will have a perfect shape.
That tip will save you a lot of potential troubles!!!
In other news, I need to start acquiring finishing pieces to the legs and have already started looking for some beefy ankles (I call them cankles). The dome should be here in the next 3 weeks, and I still have no clue about my aluminum skins!!!
Tomorrow, I will pick up some pieces for attaching the legs and get some leg photos up!!
Friday, December 2, 2011
More leg work.
Tonight, I did not get the router table back to working order. What I thought was a lose router bit, was actually a lose ROUTER! So I am still in the process of fixing it, however, tomorrow night it should be functional again.
Tonight, I did some of the more tedious, boring work. I started by drilling holes in my two inner legs. These are the holes that the screws from the mounting plate will go into. I started by drilling a hole in the center so I could get the jiggy-saw in there.
PROTIP: Don't drill your hole in the center, because then you have to jiggy all the way to the edge of the circle, instead, drill your hole closer to the edge.

After a short period of time, both were done! No matter what I do, I cannot get this picture to orientate right on here, so, please turn your head 90 degrees for the full effect.

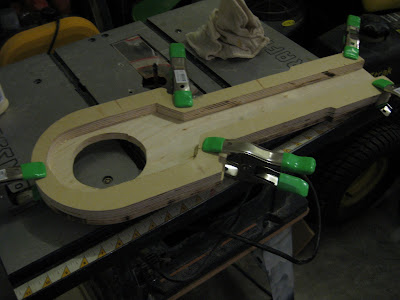
Next, I slapped some good ol' wood glue on there, an glued it up, and clamped it down.


And finally, I started a glue up of the second leg.
Just for kicks, I took a photo of them next to each other.

A couple of thoughts I would like to share with you all here. The actual woodworking phase is slowly drawing to a close. We're not there yet, but we are getting there. I was scared to make these legs as they are without a doubt one of the most difficult parts to make. I would like to thank all of my friends as they've given me TONS of help in constructing these legs, and I must say, I am VERY proud of how they are turning out. They still have some work to go, but I am confident that they'll turn out looking great.
Once these legs get done, it's time to start the fun, intricate details that makes R2 work. Motors, lights, sounds, doors, etc, etc etc......!
I want to thank each one of you for helping me throughout this build so far, and I would also like to thank all my readers, and especially the comments I get about enjoying my blog!
Tonight, I did some of the more tedious, boring work. I started by drilling holes in my two inner legs. These are the holes that the screws from the mounting plate will go into. I started by drilling a hole in the center so I could get the jiggy-saw in there.
PROTIP: Don't drill your hole in the center, because then you have to jiggy all the way to the edge of the circle, instead, drill your hole closer to the edge.

After a short period of time, both were done! No matter what I do, I cannot get this picture to orientate right on here, so, please turn your head 90 degrees for the full effect.

Next, I slapped some good ol' wood glue on there, an glued it up, and clamped it down.


And finally, I started a glue up of the second leg.

Just for kicks, I took a photo of them next to each other.

A couple of thoughts I would like to share with you all here. The actual woodworking phase is slowly drawing to a close. We're not there yet, but we are getting there. I was scared to make these legs as they are without a doubt one of the most difficult parts to make. I would like to thank all of my friends as they've given me TONS of help in constructing these legs, and I must say, I am VERY proud of how they are turning out. They still have some work to go, but I am confident that they'll turn out looking great.
Once these legs get done, it's time to start the fun, intricate details that makes R2 work. Motors, lights, sounds, doors, etc, etc etc......!
I want to thank each one of you for helping me throughout this build so far, and I would also like to thank all my readers, and especially the comments I get about enjoying my blog!
Small progress.
They legs move tantalizingly slow....every day is seems like you can only really do about 30 minutes of work, and then wait for the wood glue to cure overnight. Today, I did manage to get some more wood for the piece I messed up on the legs. I also bought a piece of 6" x 2' of poplar, which I will use for the small end pieces on the inboard size. Most people use MDF, but this poplar was only $3.00 at Home Depot.
Tonight, I will attempt to fix my router table and rout out the remaining pieces of leg. Also, I will drill a hole in my inboard legs and cut out the hole for the mounting of the gas pipes. Hopefully (if things go as planned), I will actually have more than 30 minutes worth of work! I will make another post later this evening.
Tonight, I will attempt to fix my router table and rout out the remaining pieces of leg. Also, I will drill a hole in my inboard legs and cut out the hole for the mounting of the gas pipes. Hopefully (if things go as planned), I will actually have more than 30 minutes worth of work! I will make another post later this evening.
Thursday, December 1, 2011
Gluing up the legs!
Just wanted to say that last night I glued up the 3/4" layer to the legs. Tomorrow (hopefully) I will cut out the inboard holes, and glue that one up as well. No pics, just a small update.
Tuesday, November 29, 2011
Legs Part 2.
Well, still work continues on the legs. I picked up a new router bit today and started work. However, only having enough wood to do what you need can create problems......if you mess something up.
Well, when you don't completely secure the bit in the router, problems typically occur. My full length leg piece (and template) was ruined in the process. Never fear though, I found the problem, fixed it, and finished the inboard leg. I will use the "good" outboard leg I have as a template for the next one.........or using the rest of my templates, piece together a new template. Either way, we're getting closer. I also took this opportunity to further enlarge the grooves on the middle pieces......you can tell I freehanded them. Also the center leg (pictured below) is now completely done and all glued up.


On my good outboard piece, I did have one small hiccup that I photographed here. I am not quite sure what happened, but it probably caused a 1/16" indention on the board........nothing a little evercoat can't fix.

Currently, the one good outboard piece I have is being glued with the little ankle piece out in the garage.
Well, when you don't completely secure the bit in the router, problems typically occur. My full length leg piece (and template) was ruined in the process. Never fear though, I found the problem, fixed it, and finished the inboard leg. I will use the "good" outboard leg I have as a template for the next one.........or using the rest of my templates, piece together a new template. Either way, we're getting closer. I also took this opportunity to further enlarge the grooves on the middle pieces......you can tell I freehanded them. Also the center leg (pictured below) is now completely done and all glued up.


On my good outboard piece, I did have one small hiccup that I photographed here. I am not quite sure what happened, but it probably caused a 1/16" indention on the board........nothing a little evercoat can't fix.

Currently, the one good outboard piece I have is being glued with the little ankle piece out in the garage.
Subscribe to:
Posts (Atom)