Tuesday, November 29, 2011

Legs Part 2.

Well, still work continues on the legs. I picked up a new router bit today and started work. However, only having enough wood to do what you need can create problems......if you mess something up.

Well, when you don't completely secure the bit in the router, problems typically occur. My full length leg piece (and template) was ruined in the process. Never fear though, I found the problem, fixed it, and finished the inboard leg. I will use the "good" outboard leg I have as a template for the next one.........or using the rest of my templates, piece together a new template. Either way, we're getting closer. I also took this opportunity to further enlarge the grooves on the middle pieces......you can tell I freehanded them. Also the center leg (pictured below) is now completely done and all glued up.


On my good outboard piece, I did have one small hiccup that I photographed here. I am not quite sure what happened, but it probably caused a 1/16" indention on the board........nothing a little evercoat can't fix.


Currently, the one good outboard piece I have is being glued with the little ankle piece out in the garage.

Sunday, November 27, 2011

Sexy legs!

Today, I opted to do a little more work on the legs. I really don't "have" any wood, so everything I made came from scraps that I have saved....see, another reason to save all that crap!

The first thing I wanted to do, was create the 'hollowed' out section on my mid-legs. I simply ripped out a strip down the middle of them, and used a jigsaw to do the ends. Overall, this is great for now, but maybe before the glue up, I will widen the tops a bit.


The next thing I opted to do, was start work on the center leg. After consulting with my good friend Randy, I found out the dimensions for the center leg, and went to work on the 'ends' of the center leg.


Next up, I did the 'inside' piece of the center leg...however, I only had enough scrap to do one of these. The other section would have cut into the width of the center leg by about 1/8". Since I need more 1/2" anyway, I opted to wait on the second inner section until I buy more. So with that scrap, I made the ends for the outside legs. (note: for some reason, I did not photograph the inner piece other than it being glued up)


Finally, I glued up two of the center leg pieces, and when I get more wood, I will finish it. and get all four sections glued together.


Also, I would like to note that had I not ran out of 1/2" wood....I would have been able to get the legs entirely finished today.....oh well, tomorrow i'll pick up more 1/2"!!!

Saturday, November 26, 2011

Beginning of the legs.

Because tonight is such a good night, I also decided to start on the legs! This was honestly a lot easier than I thought it would be.

I decided I would start with the 3/4" pieces, no idea why I decided to start there, but figured I would start in the middle and work out.

For this demostration and ease of photos (hey, I still am on crutches from my ACL surgery), my dad will be assisting with the process again while I take pictures!

To start with, we drew out the design on the board we wanted. This is beneficial only because we had a fairly large board, and wanted to cut it down to a small size. I read that people jigsaw them on a rough outline, I however, just made it close with the table saw. Here, you see my dad drawing out the outline.


Here you see my dad cutting the board to our rough dimensions....basically, he freehanded around the outline.


Here, you can see our router bit all set up. Check this multiple times with your templates.


Here is a couple of action shots with the router going through the wood.


Just to show you all how quickly this method can be, here is a short video I took of it as well!


Finally, here is a shot of both legs completed! They are almost spot on, there are a few rough spots, but nothing a little filler and/or sanding cannot fix. Overall, I am EXTREMELY happy with the results!!

New part day!!!

Today, also marks another NEW PART DAY (NPD)!

I arrived home to receive a package on my doorstep.....what could it be? (see that theatrics?)


I open the box, and see a lot of packing!


After removing all the packing, what do I see?!?!?!?!


That is right!! A PITTMAN MOTOR for my dome!!!!!!!!! This motor is the long-shafted (insert dirty joke) version that is required for the wooden frames! I couldn't be happier to receive this.

In other news, I also ordered the aluminum PSI kit.

Silicon on my skirt!

Okay, everything on this blog actually happened today!! (11/26/2011)

I started by laying foil out again, and getting my supplies ready.

1. GE White Paintable Silicon
2. Paper Towels
3. Aluminum Foil
4. Blue Tape
5. Red cup of water


Laying the skirt down upside down gives me the best angle for placing the silicon on.


Next up, you can see the placement of silicon on the skirt, notice how rough and gritty it looks...


Well, to fix that, it's time for a....

PROTIP: This one comes from Randy (TK8999) from the Astromech website. So THANK YOU Randy! If you get a cup of water, and dip your finger into it, and then run it down the side of the silicon, it will smooth out the silicon incredibly smooth. This will make life much easier for you.

Here's a shot of that protip in action.


Now, it's time to cut out the hole for the 3rd leg. To do this, I will place the frame upside down, center my skirt on the frame, and then trace the outline on my frame onto the skirt!

Trimming Ribs.

It's time to trim the ribs. I opted to do this a easier way than the traditional router method.

As you can see here, the ribs are too long (it's easier just to make them longer and then trim them).


What I did, was use a saw called a "pull saw".....this saw is basically a handsaw turned on it's side, and has an extremely fine blade, that is EXTREMELY sharp.


The saw is so sharp, it literally took me about 10 strokes per rib....so the whole skirt when extremely fast. Here's a look at the finished product.


Next up, Siliconing the skirt to clean the gaps.

A little behind!

Due to the Holiday, and Black Friday, I have been a little behind on my blog. Work HAS been getting done, but it hasn't been updated here. So keep in mind, the this post, and the next post, have actually taken place over several days.

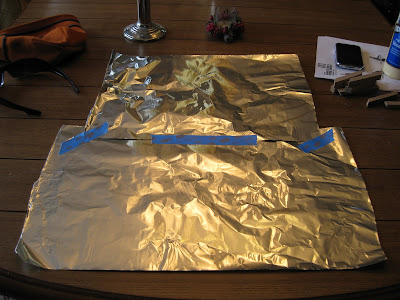
To start with, it's time to glue the ribs onto the skirt. Because I live in Missouri (Misery), it's cold outside, therefore I decide to utilize the kitchen table. To prevent any problems, I highly suggest you tape a couple pieces of aluminum foil together just to prevent any potential problems!


So I set the skirt up on the foil, and proceeded to make the angles..... I then used wood glue to glue the ribs to the skirt. The ribs are now made of MDF and I chose wood glue because it's extremely strong.


Now it's time to wait 24 hours to let the glue cure 100%.

Tuesday, November 22, 2011

Gettin' there!

Getting there. I finished Bondoing the skirt. I had one 'low' spot on the curved section that a little bondo fixed right up. Right now, the skirt is awaiting some ribs. There is a chance that I will have time to make some tomorrow, but more than likely, Thankgiving night will be the night my skirt gets officially 'finished'. Now that's something to give thanks for.

Also, I picked up a different router bit. I think the I had before was wrong, so it will be returned.

Monday, November 21, 2011

Skirt base - DONE!

Small update with no photos......but tonight, I cut the skirt base, sanded it, bondo'd it and glued it on. Also, in the process I bondo'd a small portion of my skirt that needed it......everything is smooth now.

Also note, the skirt base wanted to drift quite a bit when I first glued it. To fix this, I put four nails in the center of the skirt base going into the skirt....This will eventually be cut out for the 3rd leg. I also used 4 clamps around the edges.

Tomorrow, I hope to get some ribs done, at least one side (I hope!), and if I do, i'll get a photo up!

Sunday, November 20, 2011

The day has arrived!

The day has arrived!

This is all MDF and is near perfect. I have found a few flaws with the skirt plans, whether or not they're true or my imagination, I cannot say. However, I will document everything I did to achieve this the best I can. If the Builder's Council decides they'd like a full tutorial, then that's certainly something I would write up. However, for the most part, this short tutorial is straightforward and I promise you that this skirt building process is incredibly easy and very fast. In fact, I achieved all of what you see here in less than an hour (with the exception of gluing the MDF.

PROTIP:The skirt plans show that the widest point from side to side is 13.598".....and that the narrower end (I will refer to this as the small width on the wings)should be 11". It's generally accepted that the angles of the skirt is 36 or 37 degrees, however, this is where I find the flaw. When I glued up the boards, I measured one end as close to 13.598" as I could....and then proceeded to cut a 36 degree angle. If this angle were in fact correct, then my small width should automatically end up being 11"....but it's not, in fact, it's closer to 10-3/4". I will live with this, and don't find it that big of a deal, but keep that in mind when you're making your skirt. To confirm this, my original skirt, was done with an 11" base first....then I did two wings at 36 degrees....and believe it or not, the wide width is closer to 14".....

Here is a short, step by step process for producing this skirt. I will use some photos from my previous blog to help illustrate this process.

1. I purchase 1/2" MDF from Lowe's. It was $23.XX a sheet....not too bad and it gives me plenty of wood in case I mess up.

2. I had this cut down to 2'x3', a few smaller boards (these are perfect for the base) and one strip that is conveniently 1/2" x 3/8"....perfect for those ribs!

3. I glued all four 2'x3' planks together, clamped it up, and let it sit over 24 hours....


4. After it glued, I then proceeded to rip the planks in half....I did not measure to ensure that they were even, just that they had enough material to make two skirts.

5. At this point, I squared one end up so that I had an even side to work with.

6. Next, I set my table saw to 36 degrees and ripped the entire board.

7. Now, I took the bottom of the board, or the 'longer side' and measured over 13.598, and I think I actually did 13-9/16.

8. Next, I made sure that I was going to cut the board so that the angles matched, and cut the other side using my mark.....now I had two boards that were 3ft long, but had perfect angles cut on the sides.


PROTIP:Leave the boards long, so that if your first angular cut is messed up, you can simply move the center point back, and start over without ruining the whole skirt!

9. Next, I found the radius of the outer circle to be R8.337....I made a template out of posterboard, and then proceeded to draw the circle on the long side of my board.


10. Now I was ready to cut, according to the link I showed in my last blog post, he used a band saw with a tilting table, made a circle jig, and went to town....I opted to free hand it. (note - This is my dad who helped me so I could photograph the process).


HOWEVER....after 30 minutes, I had made very little progress...in fact, I had only cut 1/4" of one side of the circle....my patience was gone. At this point....I had an idea.

11. I said screw the bandsaw, and brought my table saw out......this is genius.

12. I set the tablesaw to 36 degrees and proceeded to make many straight cuts all along my circle.....straight cut after straight cut was made, but you can see how quickly it would go. Make sure that your cutting your angles on the correct side.

13. Once I made it all around both of my circles, I used a mouse sander, and sanded the MDF. This took about 5 minutes per side to get it buttery smooth.


14. All in all, after you have the MDF glued up, you should be able to complete this cutting and sanding in 30-45 minutes.


Here is a look at the finished product. I still need to cut the cap for the skirt, and attach the ribs, but to get this much done in less than an hour is amazing. I am going to build two skirts and provide one to a fellow Astromech member.


Couple of tips:

1. If you follow my method, I would almost suggest you go by the 11" first rather than the 13.598 like I did. At that point, I didn't know they wouldn't end up being perfect. What this means, is when I make my skirt base, rather than using the plan for them, I have to derive my own based on the width of my skirt.

2. If you could measure the side wings on this MDF skirt, you'd see that the smaller end is slightly larger than the plans....however, ALL of the other dimensions are 100% correct (with the exception of that 11" side).

3. This skirt will be heavy, but at the same time, when you're already dealing with a 150+ pound droid, what's another 10 pounds? The fact is, this skirt is so strong that you'll never worry about picking the droid up by the skirt. However, you could easily drill some weight holes in places that won't be seen.


There it is guys, it's really that easy!

Tomorrow, I plan to cut the cap and start to get the ribs cut!

Saturday, November 19, 2011

Almost!
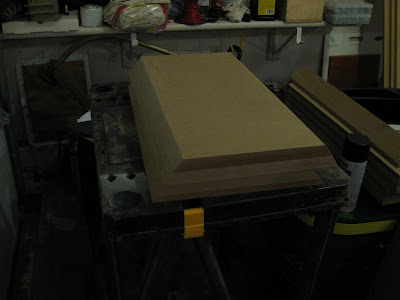
As you can see here, I have now cut the MDF into two separate pieces! Whats the reason? Well....it's the outline of a new skirt! I am approaching this one quite a bit different than the first. I saw this from another builder (http://buildr2d2.blogspot.com/2008/07/skirt.html) and decided that the idea was amazing! After contacting him, and getting a few more details, I decided to go out and do my own just like it. Tomorrow, I will use my band saw to cut the angles, and with some luck (more than I had at the casino tonight!) it will come out perfect!

PROTIP: Check your measurements. On my original skirt (see previous posts), the total WIDTH was 13-15/16.....according to the plans, it should be 13.598, which is closer to 13-5/8. This is a significant difference. After examining my skirt, I cannot find any flaws that I made, the side wings are correct in angle and height. The skirt base is 1/2", and the overall height is 2.5"....so how I got it to be 1/2" (give/take) wider is beyond me. However, with this MDF skirt, I now have the exact width of 13.598 (or damn close).

Here are a few pictures with the 36 degree angle cuts made. So far, the only downside I have found is the weight. However, there is still no 3rd leg cut (which will be last), and the length is almost twice as long as it will be when it's done. However, the stability I will gain from making a skirt like this will be worth the extra weight. Also note, that currently there is no 1/2" cap on the end of the skirt, that'll be added once the curved pieces are done.


Also wanted to show this.....I picked this up at Lowe's for 13 dollars and change. It may not be top of the line, but it's exactly what I need to start my legs. I will adjust the depth of the router so that it will cut the 1/2" and 3/4" perfectly. This means that the overall length of 1" is rather null, which means that I do not need to buy two router bits.

A new hope.

So....I bought some 1/2" MDF. I cut 4 sheets into a 2' x 3' sections and glued them all up. They've been drying since yesterday, and in a few hours, I will go out and start using a table saw on them. What is this for? If you've been talking to me via PM's on the boards, you already know. If you haven't....then hopefully, this 'new hope' of mine will work out beautifully.

Thursday, November 17, 2011

New Parts(?) Day!!!!

I am not really sure if this counts as a new 'parts' day or not, but I sure am pretty damn happy.

First, I picked up some posterboard to help fill in the gaps on my skirt. I figure this will be easy enough to cut, and once it's bondo'd over, it will be strong anyway.

Next up, you see this "mysterious" package that arrived on my doorstep today!!!! The posterboard is placed on top to cover my information, so in this shot, you can see both of the items!


After opening the package, what do I reveal??!?!?!?!?!


LEG TEMPLATES!!!!


These are truly remarkable pieces, and I intend to keep these in great condition to use for years to come. I was scared of making the leg pieces, one wrong cut, and everything is ruined, but....get a set of templates from a guy who's great at making legs.....and good things can happen!

Finally, an obligatory shot showing what R2 would look like......IF he had legs!! I hope to finish the skirt Friday night, and start the legs this weekend!!

Tuesday, November 15, 2011

Almost there!!!.

To give you an idea as to what I am dealing with on the skirt, here are a few close ups of the ribs. I am honestly not TOO concerned if they don't sit flush on the bottom. With the skirt being as low as it is, I think as long as it looks decent, most people will be not be drawn to it. However, I am hoping that my silicon will cure as many of these problems as it can!


Notice in here that nice gap between the ribs and the styrene? Thats because my stupid self used a dremel to sand the styrene.

PRO-TIP: Do NOT use a dremel to sand your styrene.


So here is a shot of the skirt, under the frame.....in all honesty, this is about 5 feet away, and it doesn't look too bad at 3ft' off the ground. The edges, while they don't LOOK smooth, actually are now, largely due to the use of the spackling and 320 grit sandpaper (thanks Senna).


Here, you will see the gap that causes it to NOT sit flush. This gap is really less than 1/4 of an inch, which isn't horrific by any means.....I am fairly certain that this area will caulk extremely well and will seal it to the frame. Down the road, if I ever upgrade frames (smell that aluminum?), then I would certainly upgrade my skirt as well. I think I can be satisfied with this skirt, however, I won't know for SURE until I see the caulking on there......the good news is, is I have faith once again in my building skills of the skirt.


At this point, all of the ribs have been siliconed and I will patch any small gaps tomorrow once they've dried. I will then use 320 grit again and just clean everything up to ready it for primer.....I figure if it looks good in primer, then it will look good on my droid.

In other news, I ordered a set of leg templates from a Astromech member(THANKS BUHATKJ!!) He has been overly nice in helping me with these, and I cannot WAIT to receive them. This will make my life a lot better having good, accurate templates for the legs already cut. I have a good router table, so maybe, in 2 or 3 days after receiving them, I can have them done......lets keep our fingers crossed!!

Monday, November 14, 2011

Success!

The results look pretty good I think. The styrene is still all buggered up, but the caulking should do the trick when I attach it. Here is a few pictures to show what it looks like with ribs installed. All that's left now is to put silicon all around the ribs and I am doing that as we speak!